11 Ways to Decorate with Wood Flowers
Did you know that fresh-cut flowers only last around seven days? If you're lucky, they could live a few days longer, but they'll start to lose their luster very quickly. Flowers are pricey, and it's a tough pill to swallow when you know that they'll die soon after your event.
Sola wood flowers are an excellent option for events or to decorate your home. Whether you or someone you love is allergic to flowers or you want a product that'll last for years, you can't go wrong with wooden floral decorations.
Are you unsure where to start decorating and designing with Sola wood flowers? This guide will discuss our top 11 favorite ways to incorporate wood flowers into decor for your event or home.
What Are Sola Wood Flowers?
Let's discuss the basics of sola wood flowers before we dive into our decorating ideas. Sola wood flowers are made from a plant called Aschynomene Aspera. Another term for it is shola.
The Shola plant is one of the preferred sustainable wood sources for crafting materials. The plant grows plentiful in waterlogged lands and rice paddies.
Manufacturers create sola wood flowers from the soft, white core of the plant. The core, or root, is supple, lightweight, and spongy. The bark or skin of the plant is just as useful as the center.
Once the bark is removed from the plant's root, the core is exposed. The cork-like and cream-colored center gets made into thin sheets. The thin sheets are shaped by hand and softened.
Sometimes a manufacturer will leave the bark on while making the plant into sheets. Leaving the bark on results in a two-tone effect.
Sola wood flowers are entirely customizable. They can be dyed in any color to fit your aesthetic needs.
How Do I Dye Them?
Dyeing sola wood flowers is straightforward. Check out our beautiful Wood Flower Dye selections.
Mixing glycerin with wood flower dye is the easiest way to dye the flowers. All you have to do is dip your flowers into the mixture.
Now that we understand what sola wood flowers are, let's dive into how you can use them.
1. Wooden Box Flower Arrangement
You can use this craft idea for home decor or decorations for a wedding, baby shower, or birthday party. For this craft, you'll need the following items:
- 15-20 wood flowers in varying sizes
- Rectangular container or wooden box (around 11"x3.5")
- Green dry foam
- Hot glue gun
- Items to stem your wood flowers, like sticks or floral wire
- Artificial moss
- Filler and/or greenery
- Wood Flower Dye
The first thing you need to do is cut your dry foam to fit inside your container. Before you dye your flowers, place your flowers in a rough layout to know how many you need. The rough design will ensure you only dye how many flowers you need.
Once you've determined how many flowers you need for your arrangement, you can dye them. Snap a picture of the layout before moving your flowers to remember what it looked like. When your dyed flowers have dried, you can stem them.
Take your stem material and gently make a hole in the base of the flower. Remove the stem, apply some hot glue to the end, and put it back in the hole. You should then cut the stems down to around three inches long.
When all of your flowers are stemmed, start inserting them back into the foam. Once all of your flowers are placed, fill in the gaps with filler flowers and greenery. Secure all of the items in place with hot glue.
You can also fill in larger gaps with more flowers if you choose. If there are places where you can see the green foam, add a bit of moss to those spots.
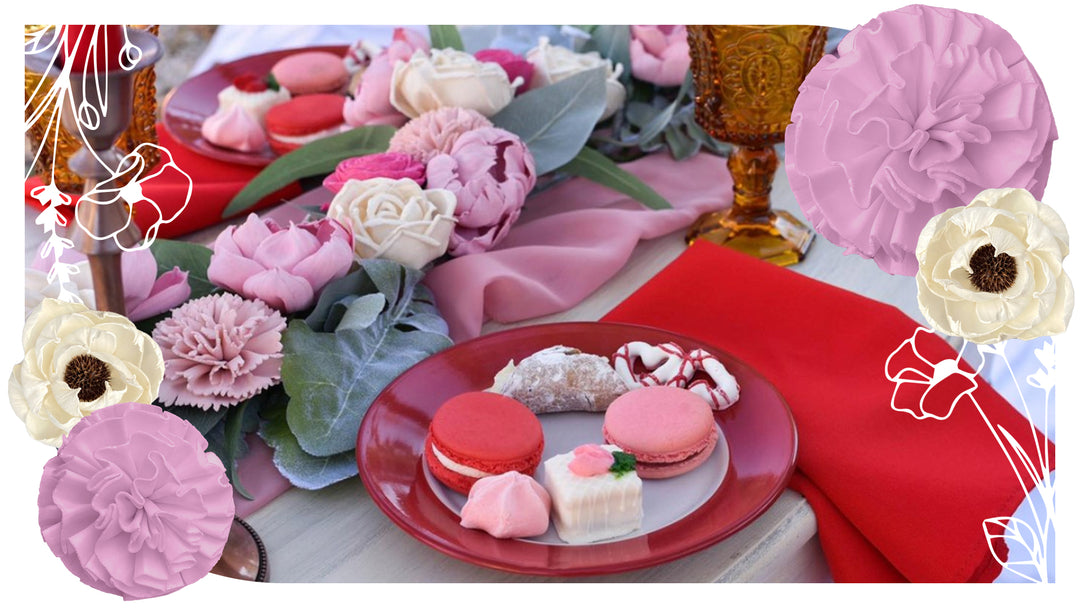
2. Table Centerpieces
You can make a table centerpiece for an upcoming event or your dining room table. There are multiple flower options to choose from, depending upon your design aesthetic and the season.
For this craft, you'll need the following tools and materials:
- Stem clippers
- Glue gun
- Wood flowers (quantity depends upon vessel size)
- Vessel
- Filler and/or greenery
- Stem material
- Floral tape
- Twine
- Wood Flower Dye
- Floral foam
One of the things to keep in mind as you start on your project is to be kind to yourself. If you're getting started working with sola wood flowers, your arrangement might not look perfect the first time.
That's why it's great to place your flowers before you glue them in. That allows you to tweak them.
Like we did in the previous craft, place your floral foam in your vessel. Your vessel should be made from a solid material, so you don't see the foam.
Place your undyed flowers in the arrangement you want. Then, dye your flowers and stem them.
Start adding your flowers to your foam once they've dried. Since your centerpiece will likely be seen from every side, you want to ensure your arrangement is well-rounded. Flowers should be facing outward on each side.
Pop in your greenery and filler once you've inserted all of your woodflowers. Like when you placed your flowers, make sure you have the same amount of greenery and fillers throughout the centerpiece. You want it to look balanced.
3. Willow or Grapevine Wreath
A decorative wreath is perfect for hanging on your front door or a wall in your home. Gather together the following materials and tools for this project:
- Any size of willow or grapevine wreath
- Wood flowers
- Glue gun and glue
- Greenery and/or filler
What's excellent about grapevine or willow wreaths is they can be left natural or painted. You can spray paint them a bright color or keep it neutral by painting them brown.
Once your wreath is dried, start with a greenery base. Place your flattest, largest leaves around the left side of the wreath. The greenery should also trail a bit along the top and the bottom edges of the wreath.
When you're happy with how your greenery looks, glue the pieces into place. Add different types of greenery until you're satisfied with the base.
Once the greenery is done, you can add your dyed flowers. Start by placing your largest flowers first.
Adding your largest flowers first ensures you'll have enough room for them. It also creates small spaces for filler flowers and smaller flowers to go. You can glue your flowers as you go or wait to glue them after you've decided on a layout.
When you've placed your larger flowers, start adding your filler flowers. Add your smaller flowers next.
You can hang your wreath where you want it to go and take a step back. That'll help you notice if there are any gaps you want to fill.
4. Floral Bouquet
A sola wood bouquet doesn't have to be reserved for a wedding. You can give a bouquet to your friend on their birthday. They also look lovely when placed in a glass vase or bottle.
Here's what you need to get started on this project:
- Wood flowers
- Stem material
- Greenery and/or filler
- Glue gun
- Floral tape
- Handle wrap
- Stem clippers
Prepare all of your flowers, greenery, and filler to get started. What's great about sola wood flowers is that you don't have to worry about whether a particular flower is out of season.
Do you want to make a bouquet out of peonies in the middle of winter? That's not a problem when you work with wood flowers.
How to Assemble Your Bouquet
You can assemble your bouquet once your materials are dyed and stemmed. Begin by holding one flower in your hand. Add other flowers around the center flower in a spiral pattern using your other hand.
Incorporate flowers that are of different colors, shapes, or sizes. Mixing up the flowers you use will ensure your bouquet doesn't look too uniform.
As you continue placing flowers in a spiral pattern, make sure you put each new row of flowers a little bit lower than the previous row. It'll help build your bouquet's round shape when you place your flowers slightly lower than the last row. You also don't want to pack your flowers too tight since we'll use filler and greenery to fill in spaces later.
Once you've incorporated all of your flowers into the bouquet, look at the design and shape you've made. You can lower or raise some of the flowers to add depth. You don't want the bouquet to have an obvious pattern to it.
You can add filler and greenery in the small gap between your flowers. Fill in all of the holes until you're happy with your bouquet.
Secure your bouquet by wrapping floral tape around the bouquet's handle. You'll want to wrap the tape where your stems come together. Add pieces of tape every few inches around the stems.
Trim your stems, so they're all the same length. You can wrap your bouquet with your material of choice. Your bouquet wrap can be ribbon, twine, or another fabric.
5. Floral Foam Wreath
Another simple wreath option is to use floral foam as your wreath's base. All you need to make this design is the following items:
- Scissors
- Hot glue
- Foam wreath form
- Greening pins
- Wood flowers dyed to your color of choice
- Wreath hanger
- Ribbon or burlap
Foam floral wreaths are a bit unsightly, so you'll want to wrap the wreath in ribbon, burlap, or fabric. Attach your material to the wreath form with the greening pins. Secure the end of the fabric with pins as well.
There are multiple ways you can design your floral foam wreath. You can place your flowers and greenery on the bottom third of your wreath, exposing the top. You can also cover the entire wreath with wood flowers.
When selecting what flowers to use, use multiple sizes, colors, and shapes. Like other projects we've talked about, start by laying out your larger blooms first.
You also don't have to worry about stemming the flowers and greenery. You can use hot glue and greening pins to attach them to the foam wreath.
Other fun items can get incorporated into your wreath. You can add wood letters, baubles, foam birds, ornaments, and ribbons. Feel free to customize the wreath to your design aesthetic.
6. Paper Wood Flower Lanterns
Do you have a birthday party or baby shower coming up? Maybe you're looking for a fun way to add a little bit of personality to your outdoor patio. Whatever the reason, paper wood flower lanterns are a great decor idea.
Here's what you need to get started:
- Paper lanterns of any size or color
- Wood flowers
- Scissors
- Hot glue
- Ribbon
Dye your wood flowers according to your color scheme. You don't have to worry about stemming them.
If you have a small lantern, you'll want to account for about three flowers for each lantern. You can use five to seven flowers for larger lanterns.
Place your flowers at the top of your lantern. You can adhere your flowers to the lantern with a bit of hot glue at the base of the flower. Secure them further by putting small dabs of hot glue wherever the flower touches the lantern.
Turn the lantern over and tie a small piece of ribbon to the bottom wire of the lantern. The ribbon is another decor element.
You can easily hang them with some fishing line. Tie your lanterns from branches, hangers, or push pins into the ceiling.
7. Monogram Letter
Personalize your space with a DIY wood flower monogram letter. Below are the things you'll need to do for this project:
- Paper mache letter
- Bread knife
- X-ACTO knife
- Floral foam
- Wire cutters
- Wood flowers
- Stem material
- Hot glue gun
Use your X-ACTO knife to cut the top portion of the letter off. Remove any cardboard filling inside the letter. You want it to be completely hollow.
If you don't like the rustic look of the letter's exposed cardboard, you can paint it any color.
Take your bread knife and use it to cut the floral foam. You need enough bricks to fill the inside of the letter. Secure the foam with hot glue.
Dye your wood flowers to your favorite colors and let them dry. Once they've dried, you can stem them. You can trim the stems, so they're a few inches long.
Place your flowers, filler, and greenery on the foam. Once you're happy with the design, you can secure it with hot glue. Hot glue a picture hanger to the back of the letter to hang the letter.
8. Flower Collage
This flower collage only takes a few supplies to make. Here's what you need:
- Embroidery hoops in different sizes
- Fabric
- Wood flowers
- Greenery
- Hot glue gun
You can find embroidery hoops at your local craft or thrift store. Purchase the hoops in whatever size you'd like.
When choosing what flowers to use, keep in mind the size of the hoop you picked out. You don't want to use big flowers with a small hoop, especially since each hoop will have multiple flowers on it.
You can use any fabric you'd like for this project. A good idea is to choose a natural-toned material that doesn't have a pattern. You don't want it to interfere with your flowers.
Secure the fabric within the embroidery hoop, pulling it tight. Once your flowers are dyed and dried, you can lay them out on the fabric. When you've determined your layout, you can glue them in place.
If desired, fill in empty holes with greenery or filler flowers. You can hang the embroidery hoops by tying a piece of ribbon on the top of the hoop.
9. Floral Lampshade
Do you have a boring lamp at your house that you're not sure what to do with? Take your lamp to the next level by covering the lampshade in wood flowers!
The materials you need to jazz up your lampshade include:
- Wood flowers
- Lampshade
- Hot glue gun
You can spray-paint your lampshade if you don't like its color. Hot glue your flowers around your lampshade. Work in a circle that starts on the bottom of the lampshade.
Experiment with placing flowers on the bottom of the lampshade, or you can cover the entire thing. You can mix and match different colors or use the same shade throughout for a uniform look.
10. Floral Crowned Animal Head
If you're a fan of unusual decor, you might like a floral crowned deer head adorning your walls. You don't have to use an actual animal skull in this project. Many craft stores sell paper mache animal busts that work wonderfully for this project.
Here's what you need to start this project:
- Animal head
- Floral wire
- Wood flowers
- Wire clippers
The first thing you need to do is start dyeing and stemming your flowers. You should leave three to four inches for the stems on your flowers and greenery. Additionally, you can spray paint the animal head in any color.
Lay the animal's head on a flat surface. Arrange the flowers on the head before you attach them.
Once you're happy with the arrangement, start removing the flowers, one bundle at a time. You'll want to start in the middle. Wrap a small piece of floral wire around the bundle.
Follow the same process for the remaining flowers. You should have several small bundles once you're done with this step.
Attach each bundle to the animal's head with additional floral wire. Wrap the floral wire around any area to help you secure the flowers to the head. Trim off excess stems.
11. Pumpkin and Flower Centerpiece
Consider making a pumpkin and wood flower centerpiece to take your Thanksgiving tablescape to the next level. You can keep the centerpiece on your table all season long if you'd like.
The materials you need for this project include:
- Moss
- Basket or another type of container
- Green foliage
- Wood flowers
- Faux pumpkins
You can dye your wood flowers any color that matches your decor. If you want to stick with the fall theme, you can dye them varying hues of orange, yellow, and brown. You can go with traditional orange or white for something different for the pumpkins.
If your container or basket has a lot of holes, you'll want to line the bottom with a cloth. The cloth keeps any small items from falling through.
Fill your basket with moss. Then, start adding in the pumpkins. Start by placing the largest pumpkins first.
Add the smaller pumpkins next to continue filling out the basket. Next, you'll want to add your greenery. You can place them by inserting their stems into the moss.
Once you've placed all your greenery, you can start inserting your filler flowers. You can even add pieces of dried grass.
Start placing your wood flowers, starting with the largest flowers first. You can insert their stems into the moss to secure them. Add a bit of hot glue to secure them even more if you're worried about them shifting.
Keep placing flowers until you're satisfied with the arrangement. You can fill in small gaps with additional greenery and filler flowers. The basket should be overflowing with beautiful blossoms and greenery.
Decorate Your Home With Beautiful Wood Flowers
Wood flowers are a great way to add color and life to your home without worrying about the arrangement dying in a week. Whether you have flower allergies or want to create something that will last for many years, sola wood flowers are a great option. There are endless possibilities when it comes to decorating with wood flowers.
Ready to learn more about how you can use wood flowers in your next event? Check out our blog for more ideas.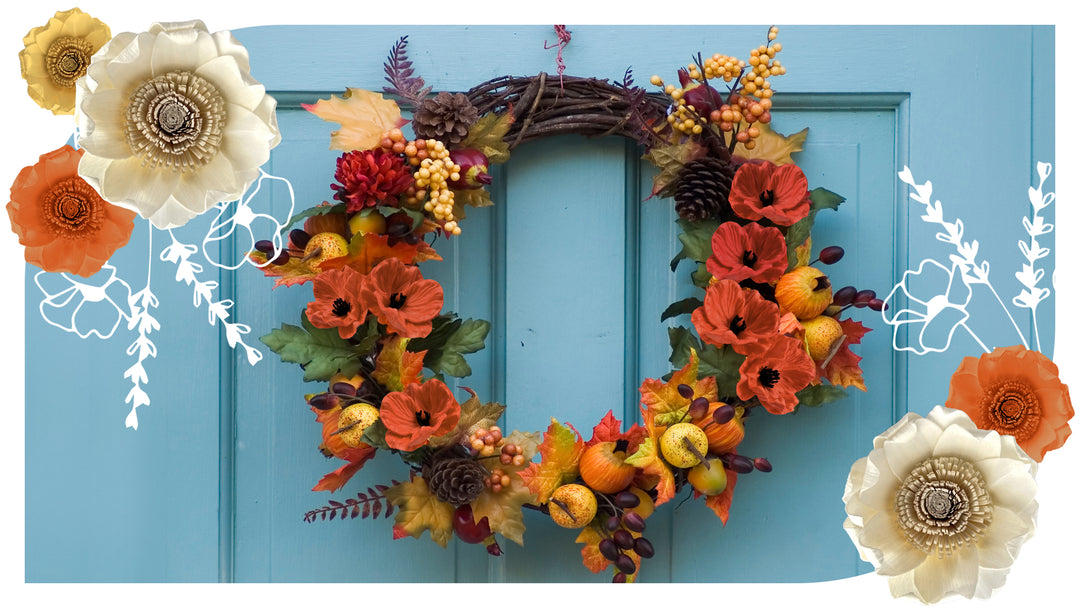
Leave a comment